Inspecting the Quarkus Native call path universe with Neo4j
This blog post is the culmination of an idea that Sanne (Grinovero) floated to me during some lunch, back at a time when we, remote engineers, would occasionally meet face to face and have the opportunity to share ideas spontaneously. I’m unsure if the lunch was in Neuchâtel or Barcelona, but essentially Sanne was diagnosing an issue and he struggled with GraalVM’s native image analysis call tree text output. He wondered whether that data could instead be formatted differently and imported into a graph database for easier inspection. I’m happy to announce that the GraalVM and Mandrel 21.3.0 releases include improvements to address this particular issue.
Essentially, they bring much needed improvements for analysing code paths that get included in the native binary. Debugging these code paths aims to answer questions such as:
why does this code path get included in the native binary?
These code paths can be optionally reported when enabling printing of the
analysis call tree. With Quarkus, this is achieved by passing in the
-Dquarkus.native.enable-reports option.
Before 21.3.0, when Quarkus instructed a GraalVM distribution to print out the call tree, the resulting output would be a single text file representing the call tree in a custom tree format. This text file would contain a lot of duplicated information and could be as big as several gigabytes in size.
GraalVM 21.3.0 introduces the possibility of representing call trees as CSV files instead of a single text file. These CSV files contain method information and different connections between them (e.g. direct calls, virtual calls, overrides, etc). One immediate benefit is that there’s no information duplication, so the CSV files can be several times smaller in size compared to the corresponding text file. In some situations, they can be as much as several thousands times smaller. However, the main reason why this feature was implemented was to make it easier to feed the call tree to other tools, like graph databases such as Neo4j. Once imported, a user can execute graph queries over the call tree, which makes it easier to extract relevant information and answer questions like the one above.
In this blog post, you will learn how to:
-
Instruct a Quarkus application to generate call tree CSV files.
-
Run a Neo4j graph database within a container
-
Import those CSV files into a Neo4j graph database.
-
Run Neo4j cypher queries against the graph database to understand the call paths in the Quarkus application.
This blog post uses the Quarkus Hibernate ORM quickstart as a sample Quarkus application. Download the application and execute:
./mvnw package -DskipTests -Pnative \
    -Dquarkus.native.container-build=true \
    -Dquarkus.native.builder-image=quay.io/quarkus/ubi-quarkus-mandrel:21.3-java11 \
    -Dquarkus.native.enable-reports
The above command will generate a native binary and the CSV files mentioned above.
Next, start Neo4j in a container:
$ export NEO_PASS=...
$ podman run \
    --detach \
    --rm \
    --name testneo4j \
    -p7474:7474 -p7687:7687 \
    --env NEO4J_AUTH=neo4j/${NEO_PASS} \
    neo4j:latest
Once the container is running, you can access the Neo4j browser via
http://localhost:7474. Use neo4j as the username
and the value of NEO_PASS as the password to log in.
To import the CSV files, we need the following cypher script which will import the data within the CSV files and create graph database nodes and edges:
CREATE CONSTRAINT unique_vm_id ON (v:VM) ASSERT v.vmId IS UNIQUE;
CREATE CONSTRAINT unique_method_id ON (m:Method) ASSERT m.methodId IS UNIQUE;

LOAD CSV WITH HEADERS FROM 'file:///reports/csv_call_tree_vm.csv' AS row
MERGE (v:VM {vmId: row.Id, name: row.Name})
RETURN count(v);

LOAD CSV WITH HEADERS FROM 'file:///reports/csv_call_tree_methods.csv' AS row
MERGE (m:Method {methodId: row.Id, name: row.Name, type: row.Type, parameters: row.Parameters, return: row.Return, display: row.Display})
RETURN count(m);

LOAD CSV WITH HEADERS FROM 'file:///reports/csv_call_tree_virtual_methods.csv' AS row
MERGE (m:Method {methodId: row.Id, name: row.Name, type: row.Type, parameters: row.Parameters, return: row.Return, display: row.Display})
RETURN count(m);

LOAD CSV WITH HEADERS FROM 'file:///reports/csv_call_tree_entry_points.csv' AS row
MATCH (m:Method {methodId: row.Id})
MATCH (v:VM {vmId: '0'})
MERGE (v)-[:ENTRY]->(m)
RETURN count(*);

LOAD CSV WITH HEADERS FROM 'file:///reports/csv_call_tree_direct_edges.csv' AS row
MATCH (m1:Method {methodId: row.StartId})
MATCH (m2:Method {methodId: row.EndId})
MERGE (m1)-[:DIRECT {bci: row.BytecodeIndexes}]->(m2)
RETURN count(*);

LOAD CSV WITH HEADERS FROM 'file:///reports/csv_call_tree_override_by_edges.csv' AS row
MATCH (m1:Method {methodId: row.StartId})
MATCH (m2:Method {methodId: row.EndId})
MERGE (m1)-[:OVERRIDEN_BY]->(m2)
RETURN count(*);

LOAD CSV WITH HEADERS FROM 'file:///reports/csv_call_tree_virtual_edges.csv' AS row
MATCH (m1:Method {methodId: row.StartId})
MATCH (m2:Method {methodId: row.EndId})
MERGE (m1)-[:VIRTUAL {bci: row.BytecodeIndexes}]->(m2)
RETURN count(*);
You can download the cypher script from
this
link or copy and paste it in a file called import.cypher.
The script above is generic enough to work with any Quarkus application, but
it will only work with Mandrel 21.3.0.Final. GraalVM CE 21.3.0.Final lacks
the symbolic links to make the csv file references work, so if you’re on
this GraalVM CE, you’ll have to modify the CSV file names with project
specific, timestamped, file names.
|
Next, copy the import cypher script and CSV files into Neo4j’s import folder:
$ podman cp target/*-native-image-source-jar/reports testneo4j:/var/lib/neo4j/import
$ podman cp import.cypher testneo4j:/var/lib/neo4j
After copying all the files, invoke the import script:
$ podman exec testneo4j bin/cypher-shell -u neo4j -p ${NEO_PASS} -f import.cypher
| If you need to reimport the data, you’ll need to clear the previously imported data, otherwise you’ll get errors. You can clear the previously imported data by executing: |
$ podman exec testneo4j bin/cypher-shell -u neo4j -p ${NEO_PASS} "MATCH(n) DETACH DELETE n"
$ podman exec testneo4j bin/cypher-shell -u neo4j -p ${NEO_PASS} "DROP CONSTRAINT unique_vm_id"
$ podman exec testneo4j bin/cypher-shell -u neo4j -p ${NEO_PASS} "DROP CONSTRAINT unique_method_id"
Once the import completes (shouldn’t take more than a couple of minutes), go to the Neo4j browser and you’ll be able to observe a small summary of the data in the graph:
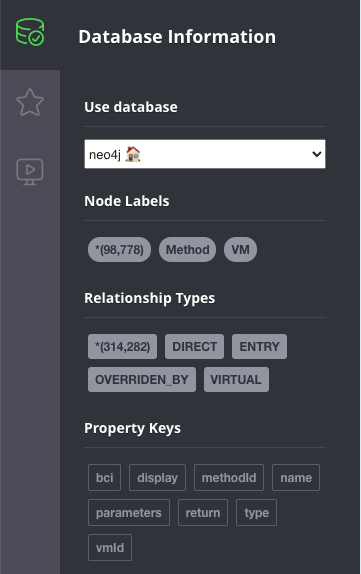
The data above shows that there are ~100000 methods, and just over ~300000 edges between them.
Next, let’s try out some cypher queries to explore the call graph. I don’t
know anything about the Quarkus application itself, but given it’s a
Hibernate ORM application, I can assume that some sort of persist method
will be called. Go into the browser and type a query for this:
match (m:Method) where m.name = "persist" return *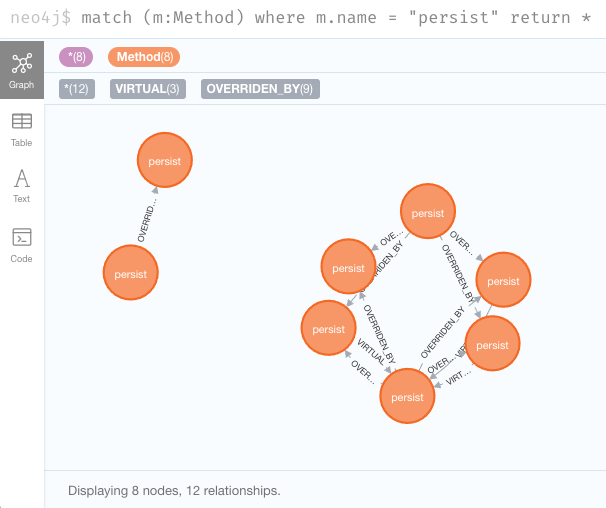
We got some hits, but the default style for the nodes presented is not very
readable. We can however tweak the stylesheet as shown by
this guide.
Two useful modifications for this use case is to increase the default node
diameter value to say, 150px. The other modification is to switch
node.Method caption value to "{display}".
display is a field within each method that shows a shortened id of the
method, that includes package and classname (only the first letter of each),
and the method name in camel case with single letters.
E.g. j.p.EM.persist would be the display for the persist method in
javax.persistence.EntityManager.
|
Let’s repeat the query after modifying the browser style and moving the nodes to clearly view them:
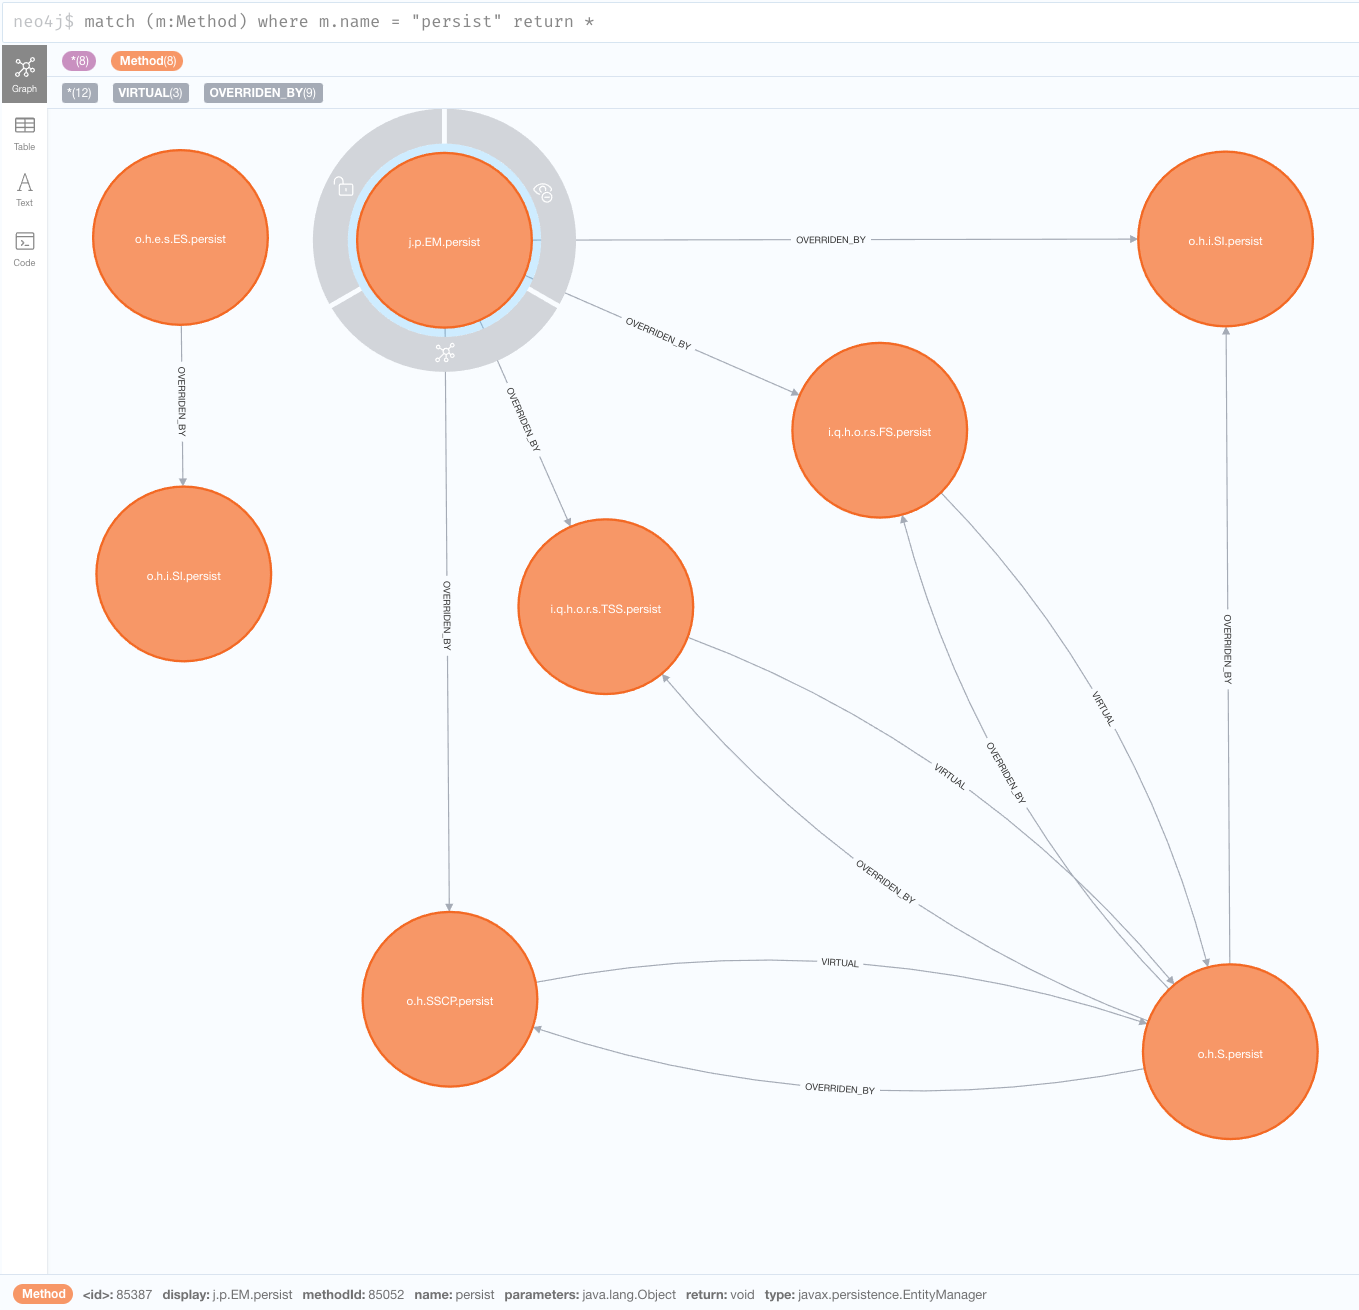
We can see above that one of the persist is to
javax.persistence.EntityManager. This is the JPA method for persisting
entities and the one we’ll be exploring further. Let’s narrow the query
down to that one to have a clearer view:
match (m:Method) where m.name = "persist" and m.type =~ ".*EntityManager" return *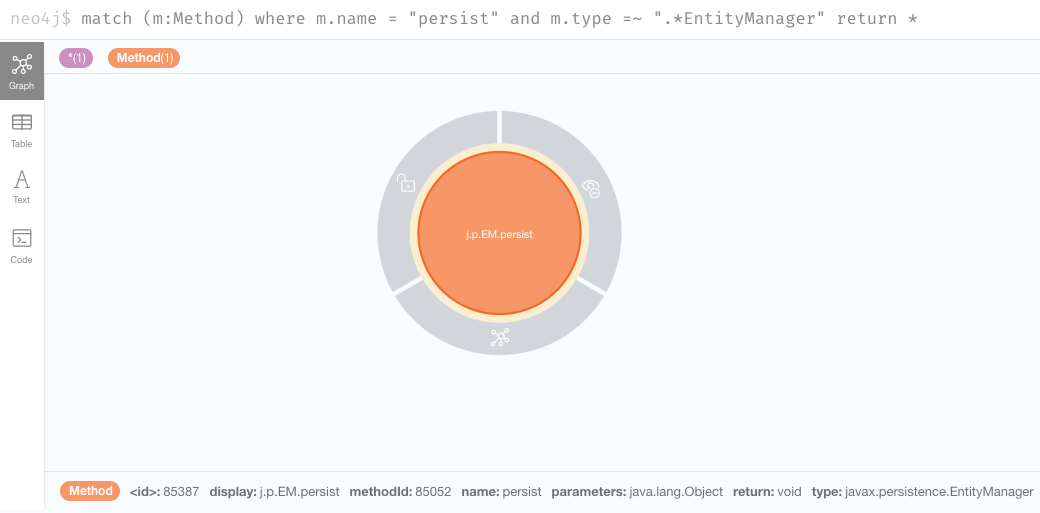
Note that if we hover over the node we get information about the method itself.
Going back to the original question, we wanted to find out why a given code
path gets included. One way to do it is to start by the method itself, and
then walk backwards to find what links (e.g. direct calls, virtual calls,
overrides…etc) exist to that method within a certain depth. For example,
let’s try to find what other methods have a direct link to the persist
method:
match (m:Method) <- [*1..1] - (o) where m.name = "persist" and m.type =~ ".*EntityManager" return *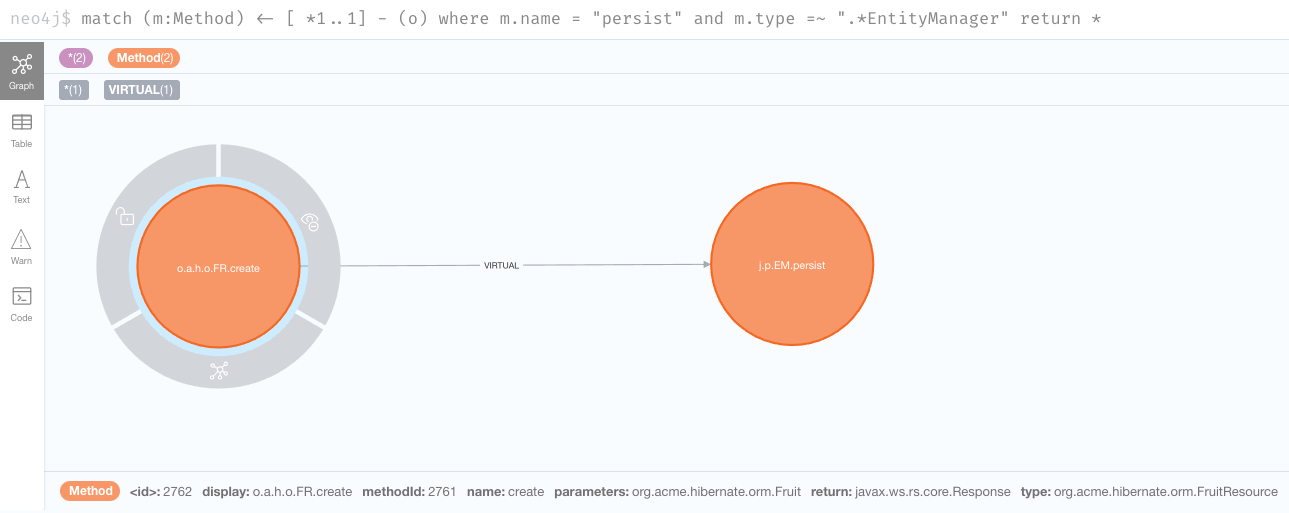
Aha, so there’s only one path and that’s a virtual call (i.e., an interface
call) that comes from the create method in the
org.acme.hibernate.orm.FruitResource class, which takes a
org.acme.hibernate.orm.Fruit parameter and returns a
javax.ws.rs.core.Response.
Next, let’s expand the query further and try to find all links with a depth
of 2 to the persist method:
match (m:Method) <- [*1..2] - (o) where m.name = "persist" and m.type =~ ".*EntityManager" return *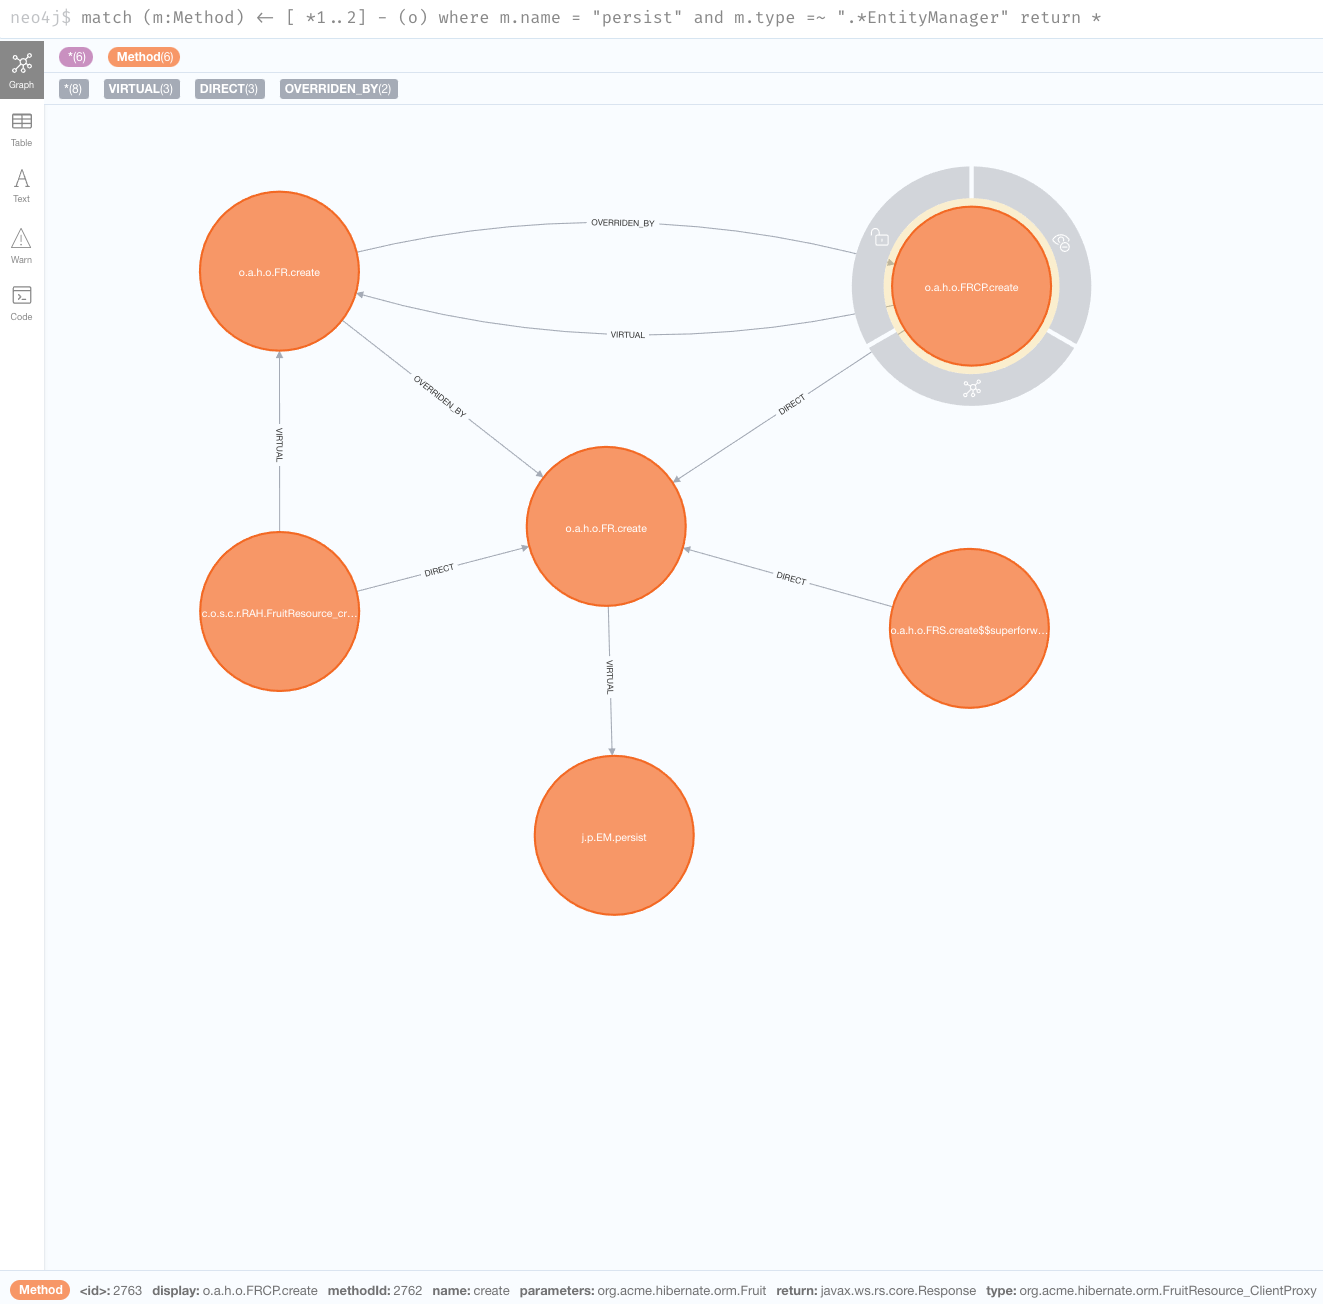


As we peel further back, we start to see some generated classes that invoke
the create method in org.acme.hibernate.orm.FruitResource.
org.acme.hibernate.orm.FruitResource_ClientProxy and
org.acme.hibernate.orm.FruitResource_Subclass both directly call the
method. One more interesting call comes from the
FruitResource_create_d0… method in
com.oracle.svm.core.reflect.ReflectionAccessorHolder. This essentially
means that the create method has been registered in GraalVM for access via
reflection.
If we query for a depth of 3, we’ll find that the reflection access is an
entry point. So, we’ve found the shortest path to the persist method, but
that’s not necessarily the only path:
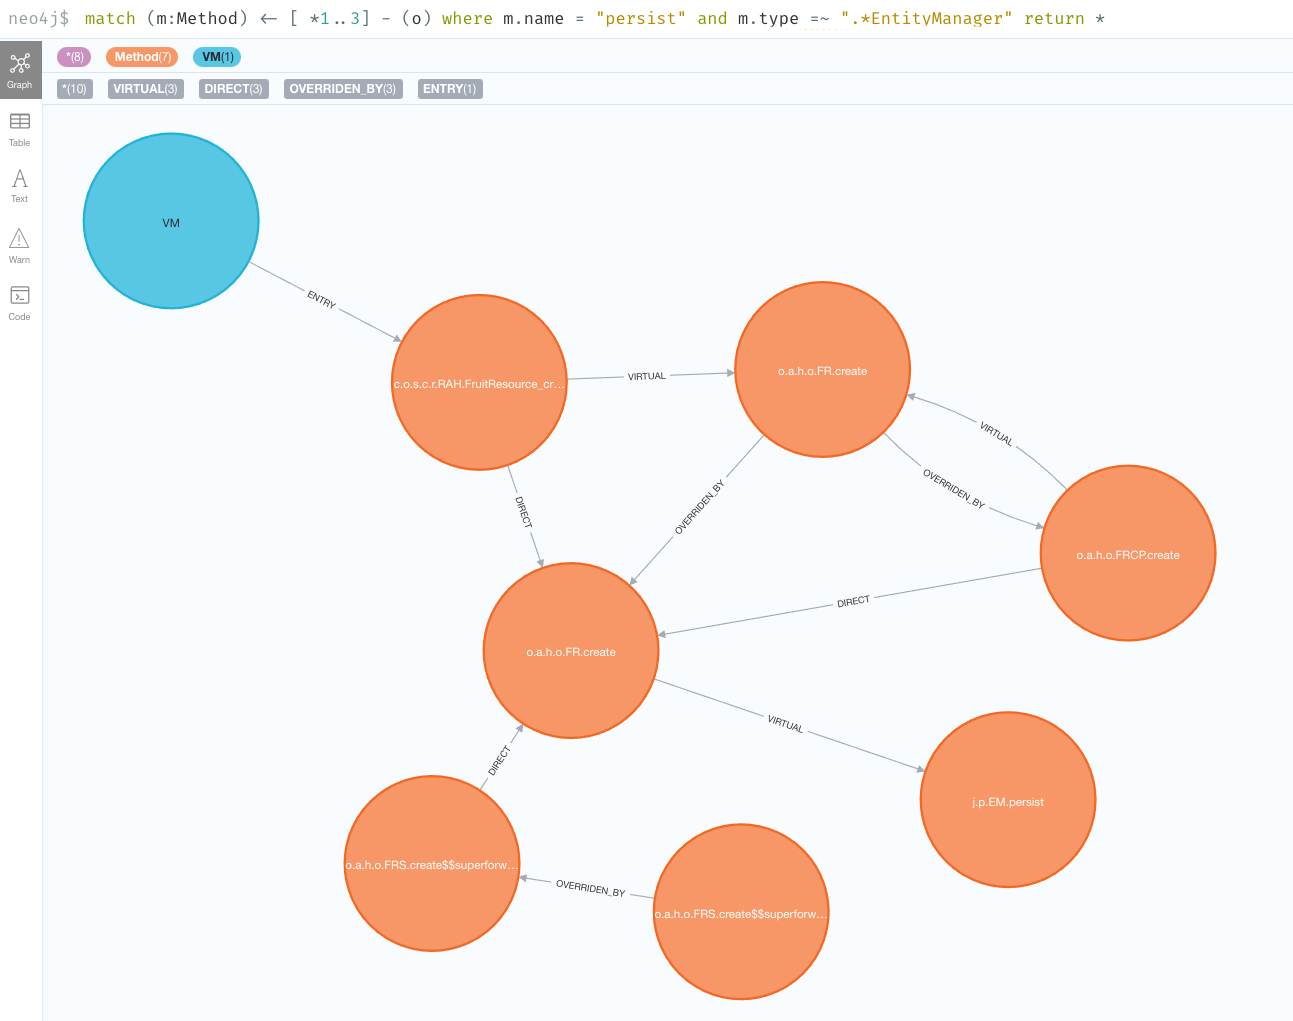
You can continue going up layers, but unfortunately if you reach a depth with too many nodes, the Neo4j browser will be unable to visualize them all. When that happens, you can alternatively run the queries directly against the cypher shell. E.g.
$ podman exec testneo4j bin/cypher-shell -u neo4j -p ${NEO_PASS} \
    "match (m:Method) <- [*1..10] - (o) where m.name = 'persist' and m.type =~ '.*EntityManager' return *"
After you are done with the exploration don’t forget to shut down (kill)
the testneo4j container:
$ podman kill testneo4j
Note that this will also remove the container (since we used --rm when we
created it).
We’ve only just started exploring the possibilities of Neo4j for this use case, and so we still have to learn all the tips and tricks to make the most out of it. As we learn more we’ll share any tips or query templates with the community.

